
Organizing Your Digital Life
RVing is all about making memories and, these days, those memories are continually being captured on cell phones, GoPros, and all sorts of digital cameras. It seems like ages ago, but in the early 2000's Kodak was still a household name, Walmart or the grocery store was where we dropped pictures off for processing (Double prints! Over-sized prints!). Camera stores were common, and digital photography was the widgety domain of hobbyists, not pros.
How quaint.
I started my career in photography and built a very successful corporate media company around that passion. But by the late 1980's, my Nikons were gathering dust as staff and contract photographers were now doing the work. It wasn't until 2000, when Nikon introduced the three-megapixel, split-in-half, Coolpix camera that I started to drift back into taking pictures for fun.
With digital photography, snapshots were snappier and there was no waiting for processing. Darkrooms had been replaced by photo editing software and photographic-quality inkjet printers. Though I never returned to filling camera bags and cabinets with lots of high-end photo gear, I've owned a steadily improving succession of hobbyist and prosumer digital cameras that are pretty amazing. And perhaps, none more so than the camera in my current iPhone X.
I just mentioned photo quality inkjet printing, but who even does that anymore? It's all about squinting at photos on our phones (so much for wallet photos), or maybe gazing at our iPads. Digital has made it super easy to capture and share an image. Today digital photography is like social media, it's all about "being in the moment." But sooner or later, as the years go by, those moments will become the stuff of deeply satisfying golden memories. Making sure you can find those memory pearls, and that they're preserved, isn't probably something you've given much thought to -- but you should.
The joys and confusions of photo software
When it comes to managing the continual stream of digital photos, the pros have it all figured out. But for casual and hobbyist photographers, it's a different story. If you're a Mac owner, you're in luck. The Photos app that's free on every Mac, iPad, and iPhone is a great organizing and editing tool. Windows owners still need to piece together two or three free or paid programs to equal the overall features of Apple Photos.
 The free Apple Photos App is the Swiss Army knife of photo editing and management software.
At the top of the pile are the expensive photo editing products like Adobe Photoshop (deep editing and manipulation) and Lightroom (touch-up and organization). These are pro tools and Adobe is pushing people into $10 a month subscriptions to use them. If you're a casual photographer, that gets pretty expensive. There's a great one-time-purchase, high-end photo editing option for Macs called Affinity Photo ($50) - which gets you very close to Photoshop. There's also Gimp, which is a free open-source photo editor software that is available on both Windows and Macs. But programs like this only help you edit your photos, not catalog and manage them.
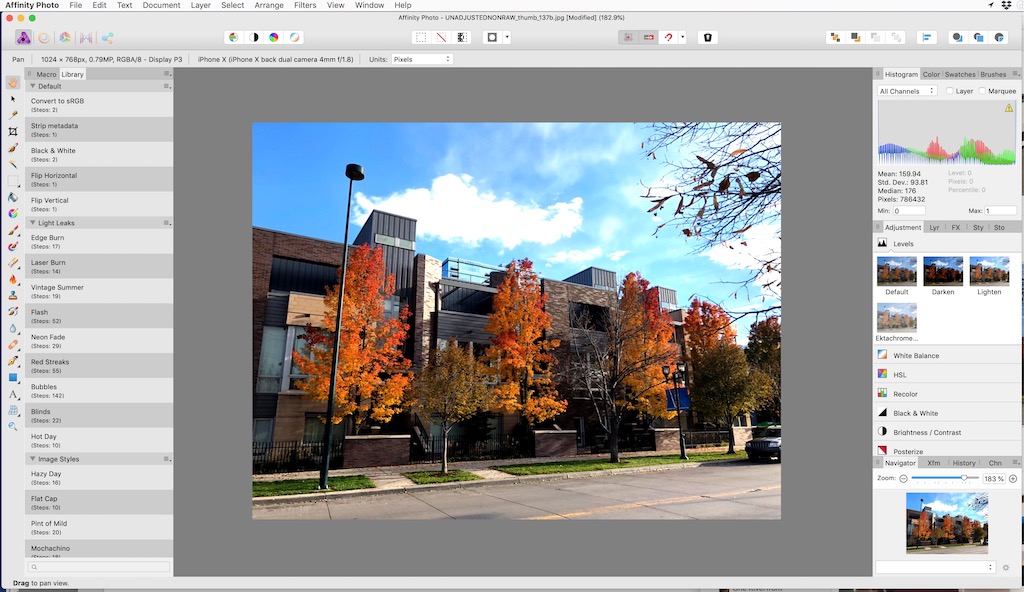 Affinity Photo for Mac and iPad is a very affordable and powerful alternative to Photoshop with plenty of pro editing capability.
If you have iOS or Android phones/tablets, you can also find dozens of inexpensive apps for adjusting and applying special effects.
Today, editing your pictures for color and cropping is easy and there are lots of solutions. Where it gets harder is in photo management. Apple's Photos does this quite nicely by automatically organizing your photos by date, collection, or people.
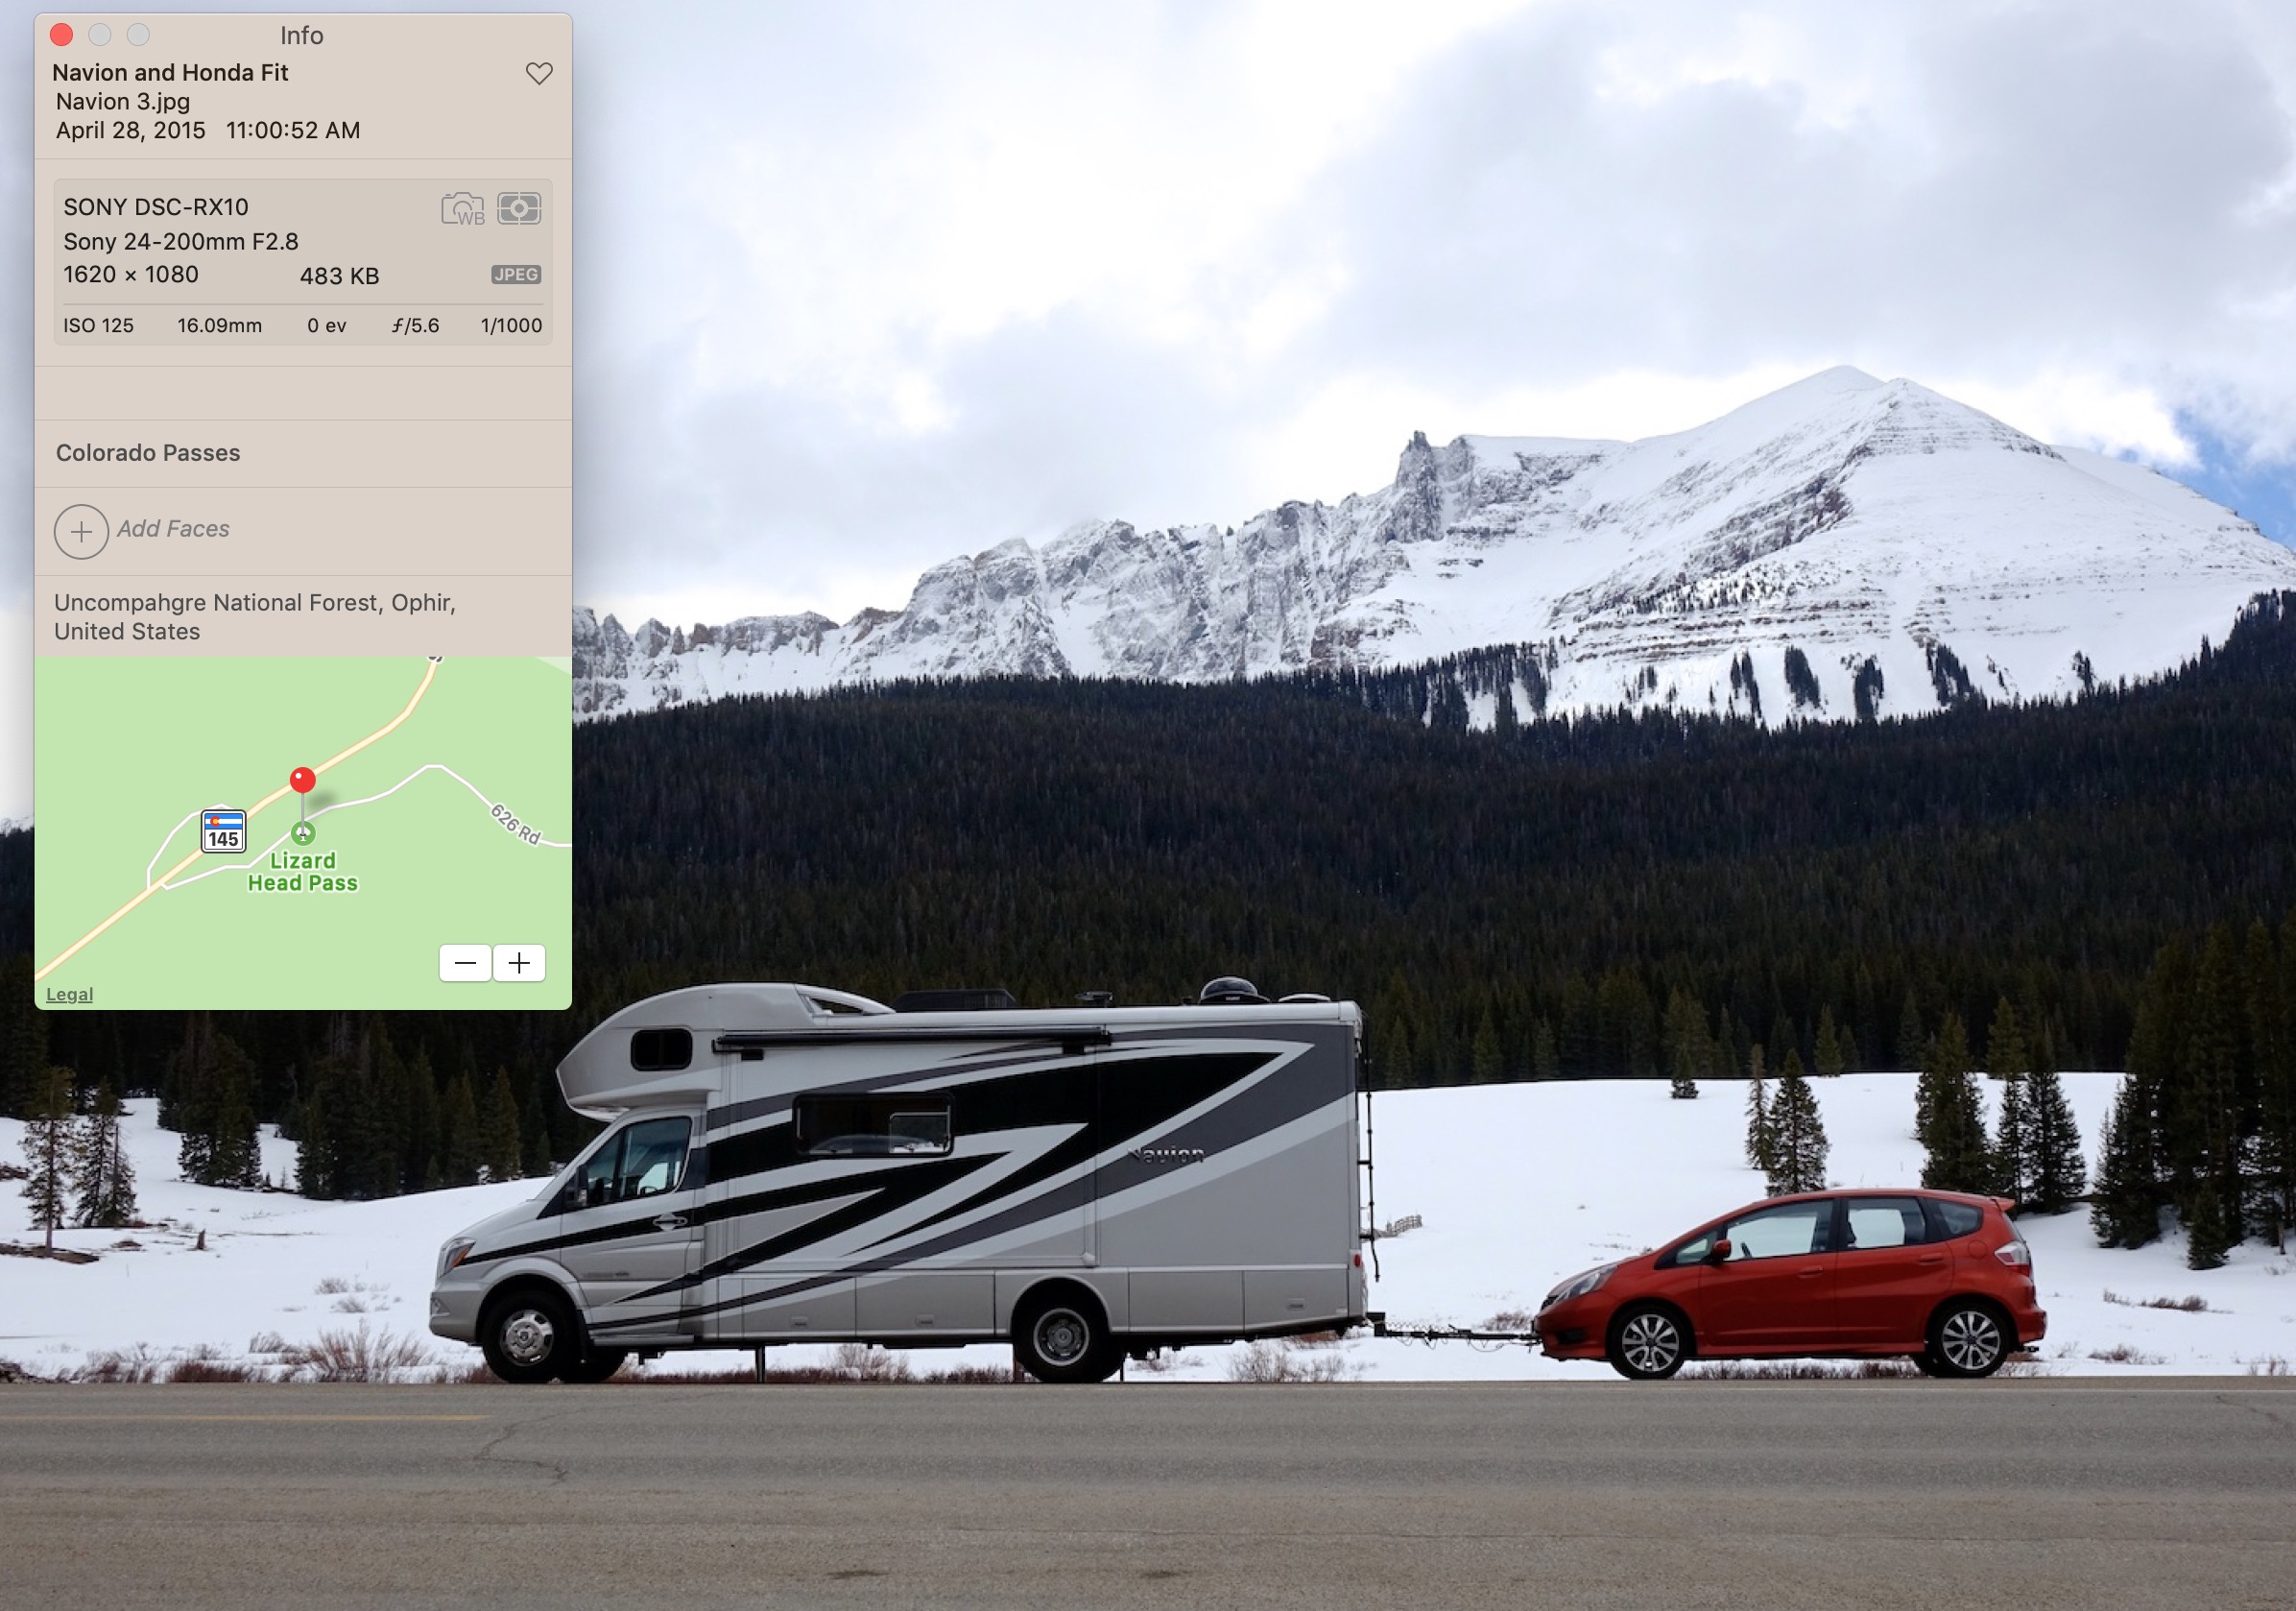 You can attach a lot of additional information to a digital image beyond simply changing the file name, such as tags for keyword searches and location where the photo was taken.
For pros, the go-to organizing software is Adobe's Lightroom, which can be used on a monthly subscription basis or (at least for now) purchased as a standalone application. However, if you're simply looking at a good file management program, Adobe has a no-strings, truly free program called Bridge which you can download. While Bridge doesn't offer any image retouching tools, it's a fantastic way to access and manage folders of photos.
 Adobe Bridge is free for both Macs and PCs and is a great tool for organizing and managing your photos.
How photo management works and the great risk it entails
The way programs like Apple Photos and Adobe Lightroom work is that they suck in your pictures into a highly optimized database. This is great for accessing and editing your pictures. And, in a digital world, where people tend to take a lot more pictures than they used to (no film and processing costs), these powerful organizers are invaluable. But ... and this is a huge but ... all those photo files are dumped into one giant database (it can be gigabytes in size). If that database becomes corrupted. or your hard drive dies, or you switch phone operating systems (like from Apple iOS to Android), poof goes your pictures. Got your attention, didn't I?
How to manage and preserve your digital photos forever
Organize by folders
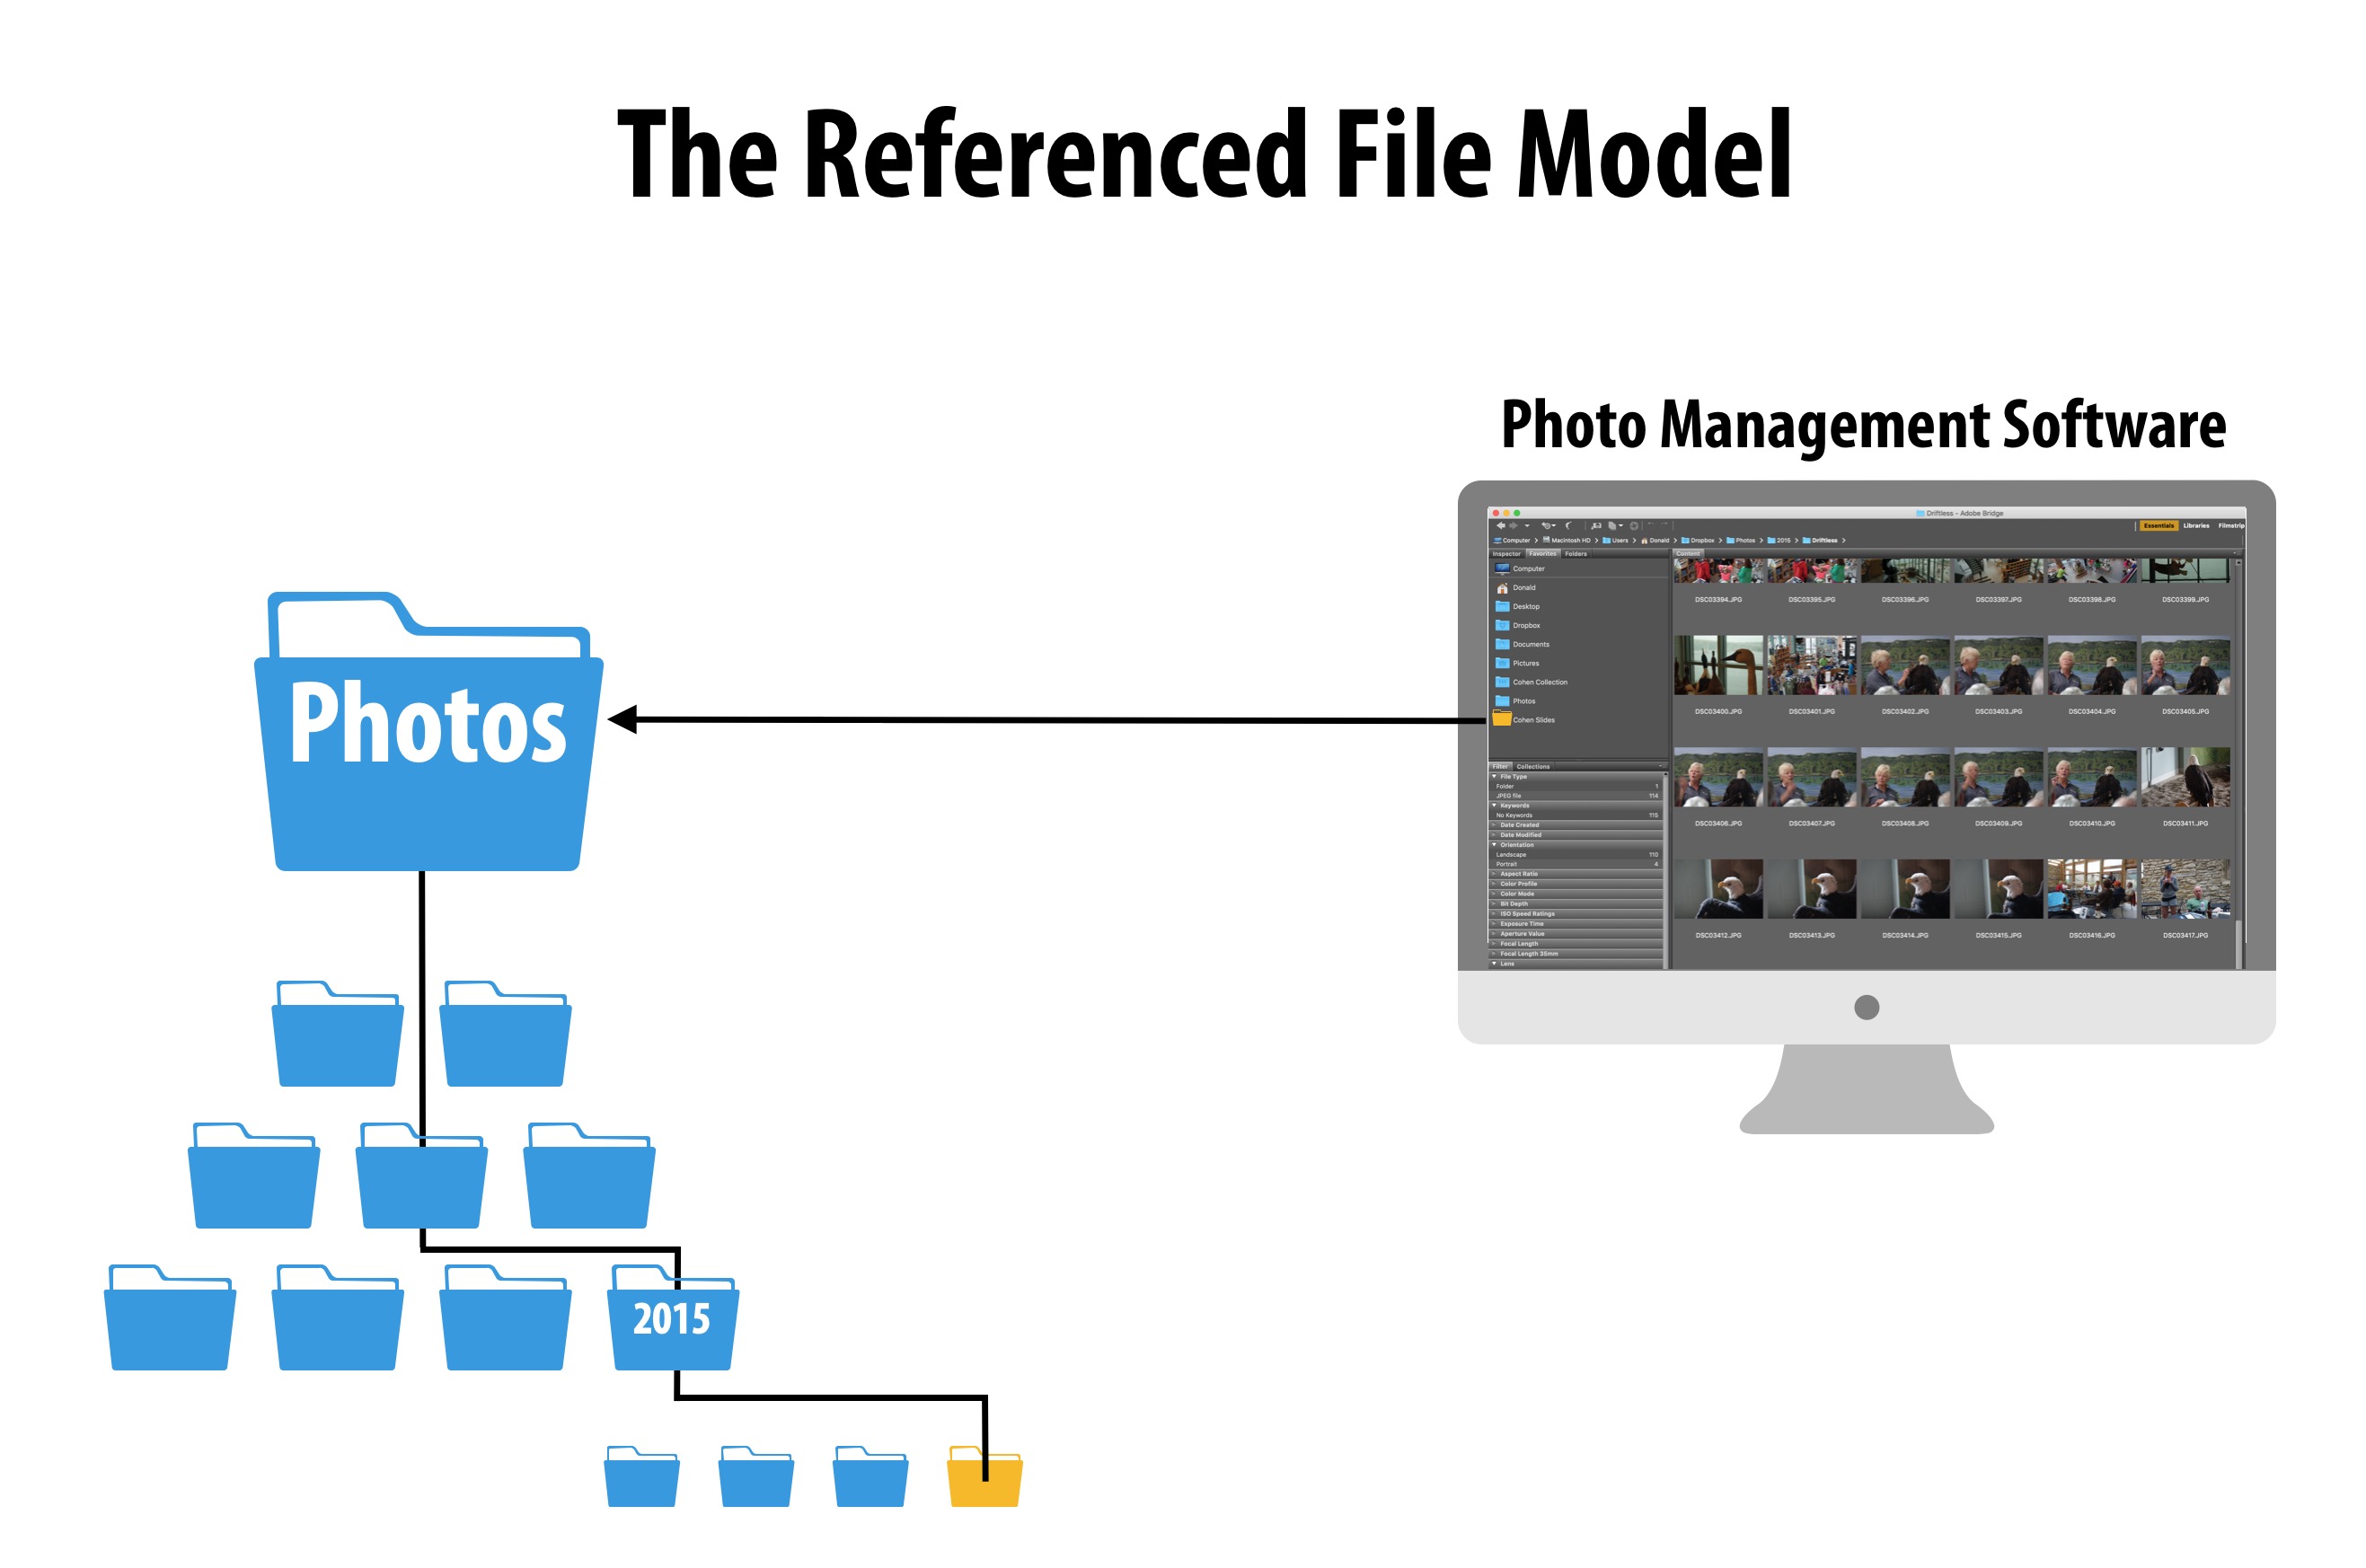
Because professional photographers depend on maintaining photos for a living, they almost all use a "referenced file" system. While there may be some variance in approaches, here's the one I use.
When I've been taking pictures with one of my digital cameras, like during a trip, I pop out the memory card and either using a built-in or accessory card reader on one of my computers, I copy the recent files into a new folder. I create a folder for each year. Then, within that year, I create a sub-folder by topic (a trip or event). That's where all the photos wind up. Because I have plenty of hard drive capacity, I tend to leave my iPhone photos inside the Photos app. But by using the export command from the app, I create a duplicate of the picture in an event folder that may also contain pictures from my other digital cameras. Now all my shots from my various cameras are all in one place inside a single folder.
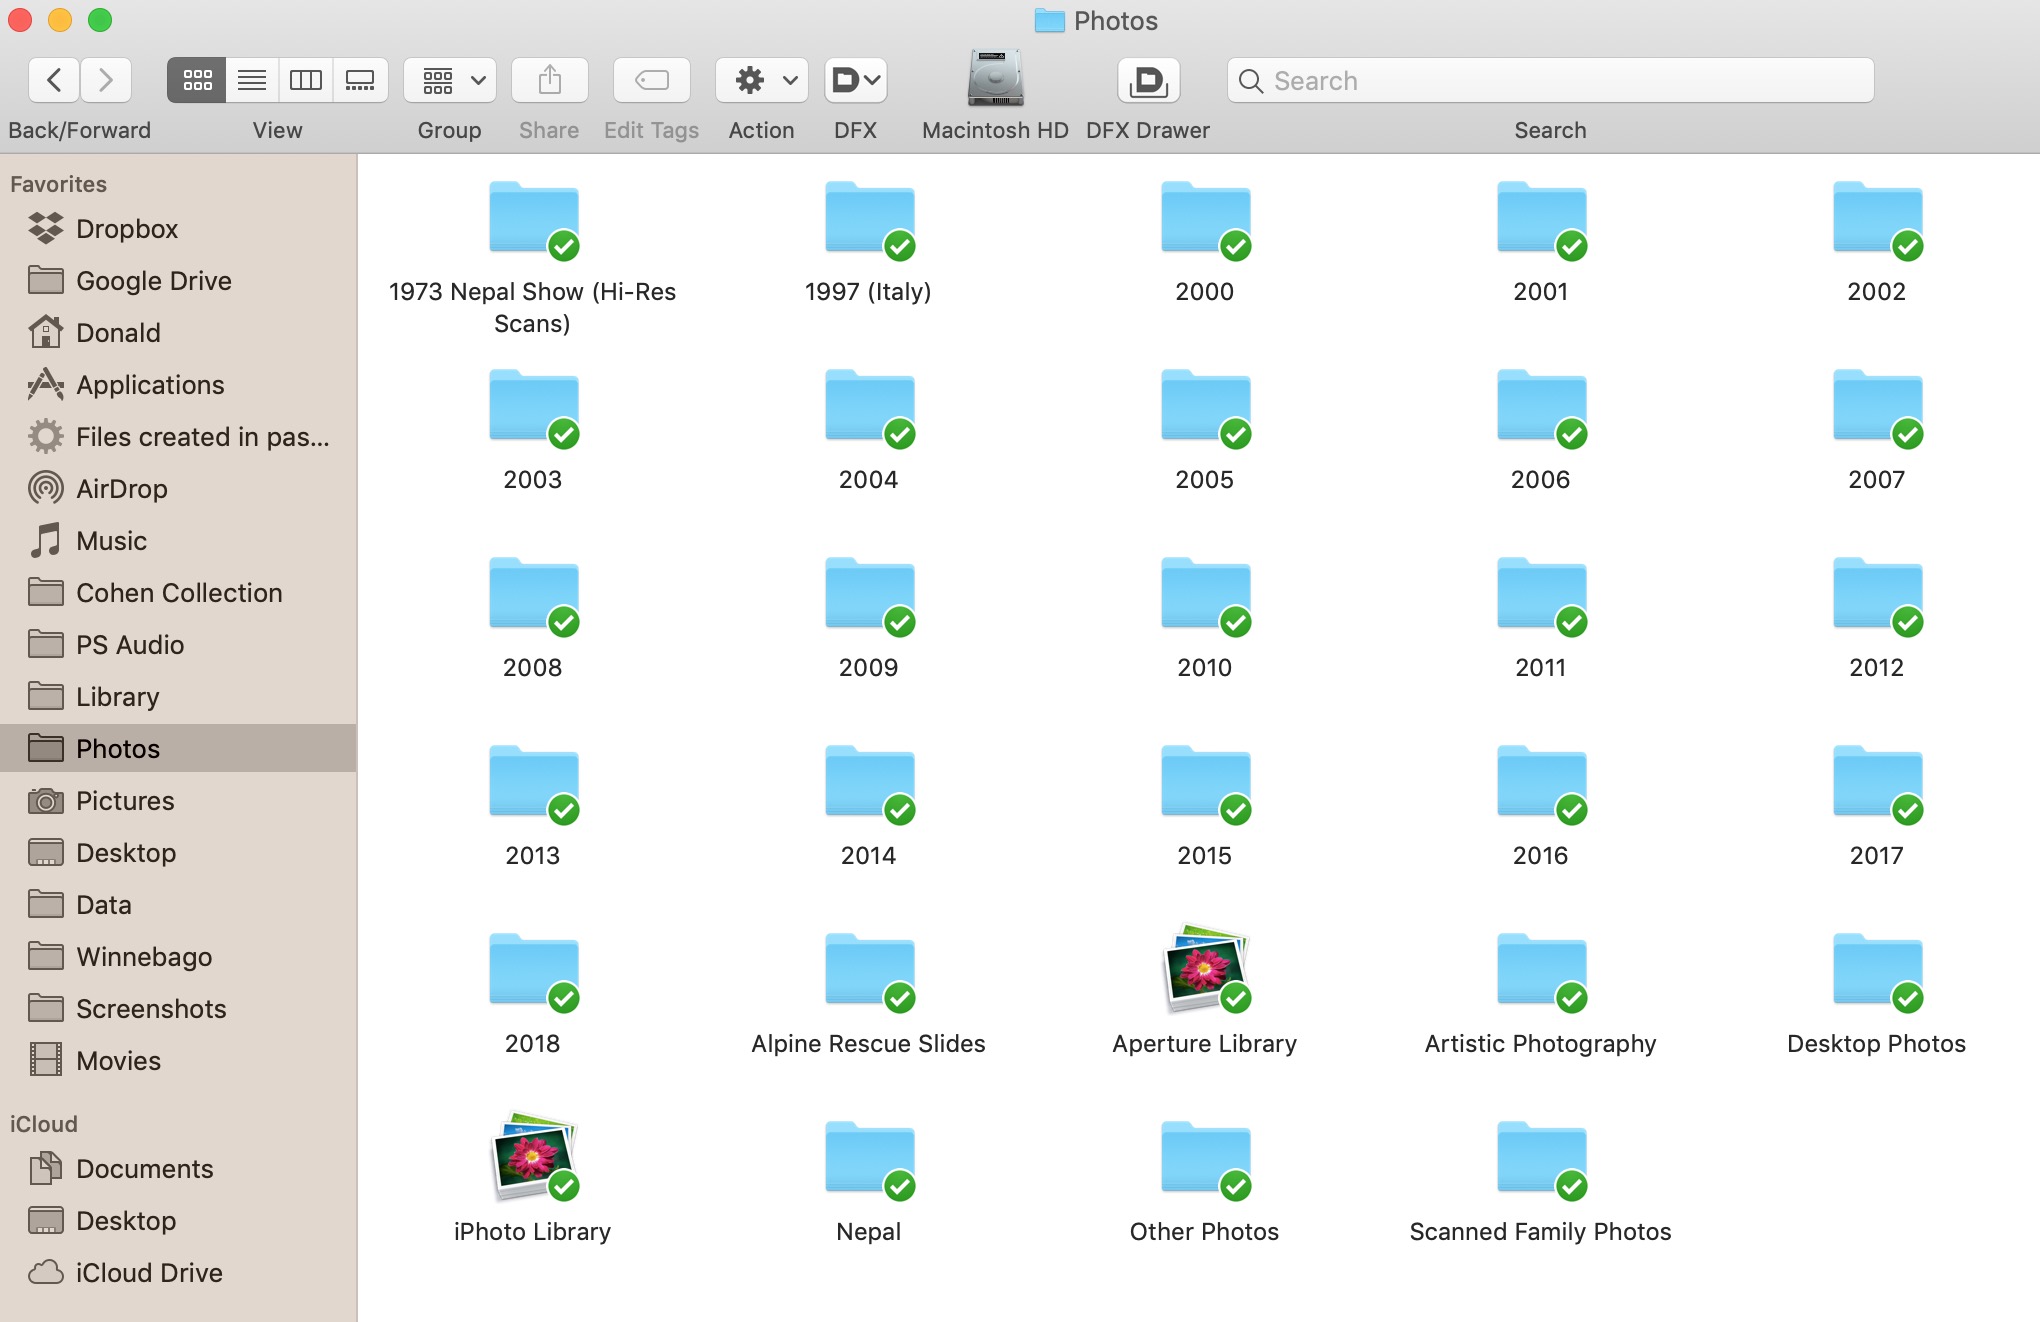 This screenshot shows all my photos arranged by year. The green check mark indicates that this folder has been saved to my Dropbox account on the cloud -- so there's now a backup.
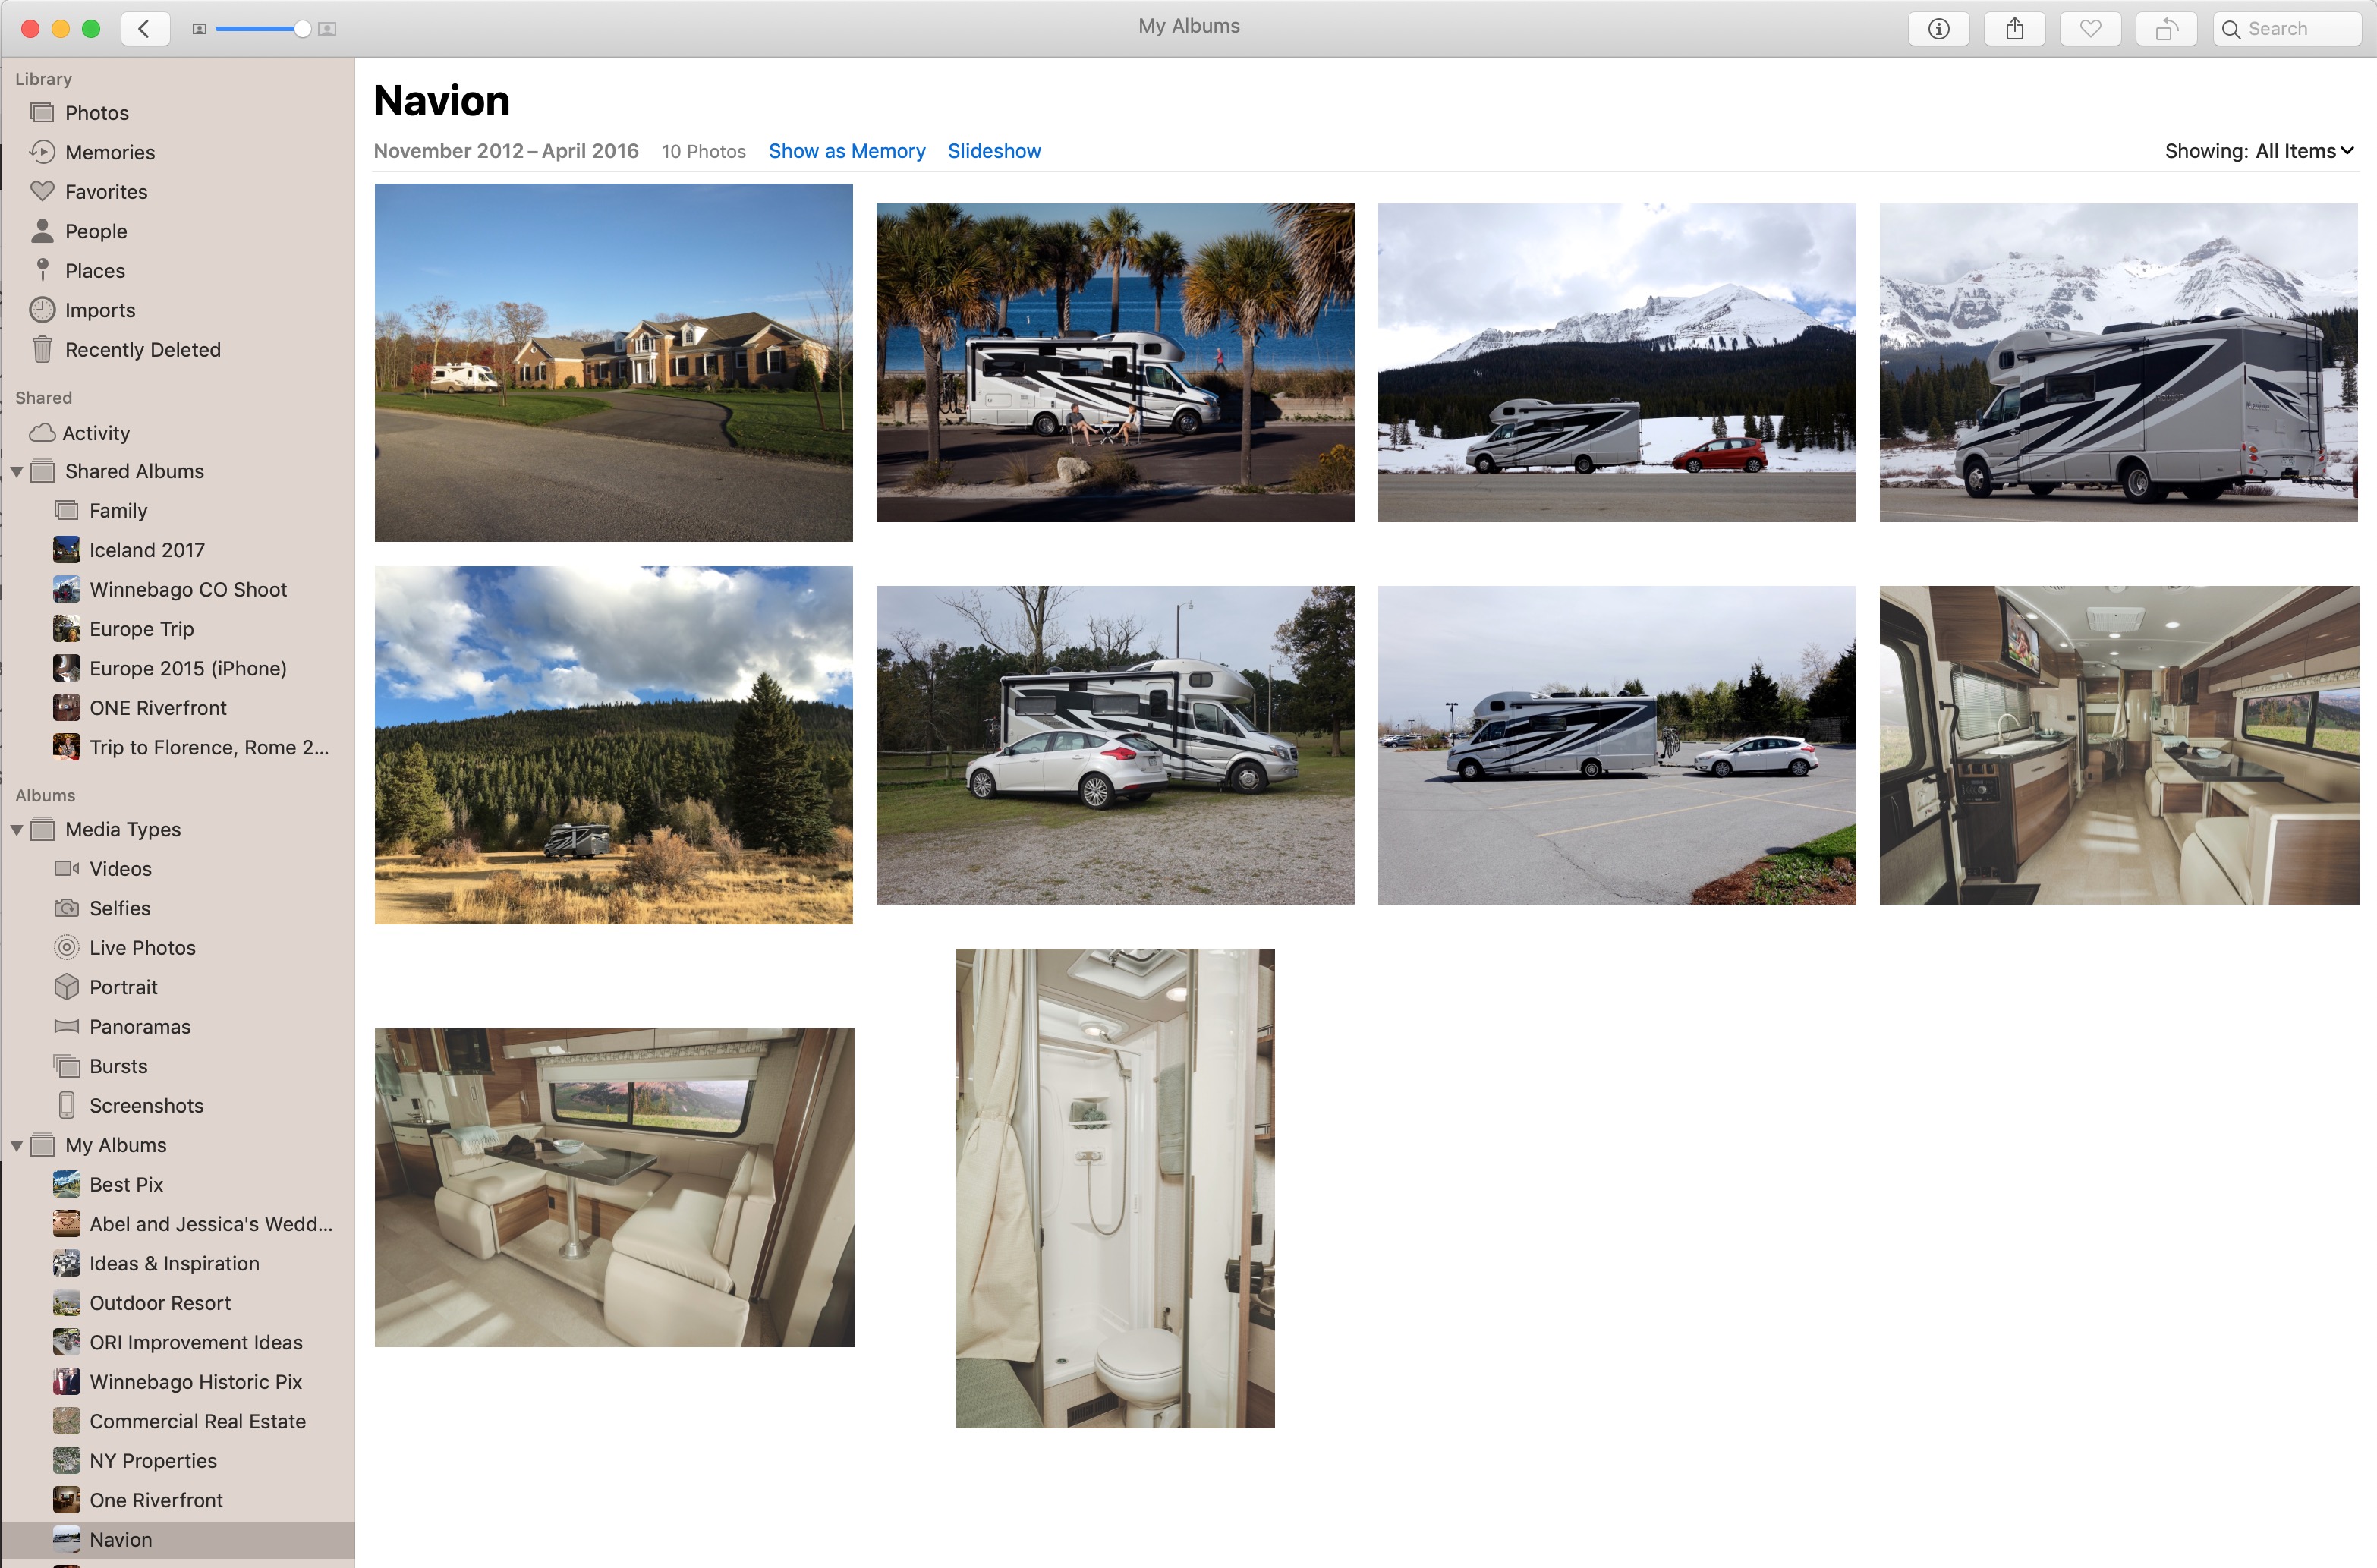
 All my photos taken in 2017 are arranged by events.
If I've been taking pictures with my iPhone, all of its pictures and videos are automatically uploaded to my iCloud account - which can be viewed through the Photos app on my computer, iPad or iPhone. Using the Photos app on my Mac, I periodically export the photos I've taken throughout the year into a folder I've created on my hard drive.
While this process duplicates what I have in the Photos app, when I use a heavy-duty tool such as Lightroom, I don't import my images into the program. Instead, I tell Lightroom to reference the pictures in my folders.
 Organize your pictures within years and then by events.
By keeping all my original photos in yearly folders, and within sub-topic folders, I have all my photos in one place. That makes it super easy to back up.
 One strategy is using dates for naming folders, so they can be displayed in ascending or descending order. This was great for all the years of family photos I digitized.
Backup strategies
With all your photo sub-folders inside one main folder (I unimaginatively named mine "Photos"), this makes it very simple to make a backup copy to an external hard drive, USB memory stick, or CD/DVD. Some years ago, when photo files were smaller (fewer megapixels), and I didn't have as many pictures, I would burn a CD (650MB) or DVD (4.7GB) disc of the pictures. However, my accumulated photo library is now tipping the scales at 288 GB, so copying to discs no longer makes sense.
Long held corporate backup strategies usually hold that you should have three copies (original, plus two) of your files. At least one of those copies should be stored at a second location.
So, let's talk about the actual storing of your files. Some years ago, it was claimed that if you burned CD/DVDs that your data would last for 100 years. Hmmm. While nobody's lived long enough to find out, the growing body of thought is that no data, on any medium, may last longer than ten years. Dyes inside the disc may fade and electrons float away from silicon memory chips.
Just like storing paper photo prints, you should keep your physical data media in a dark, cool place - and away from electric sources, such as power outlets. Today, I back up onto three different storage media: a hard drive, SSD drive, and the cloud. Let me take you through each of these.
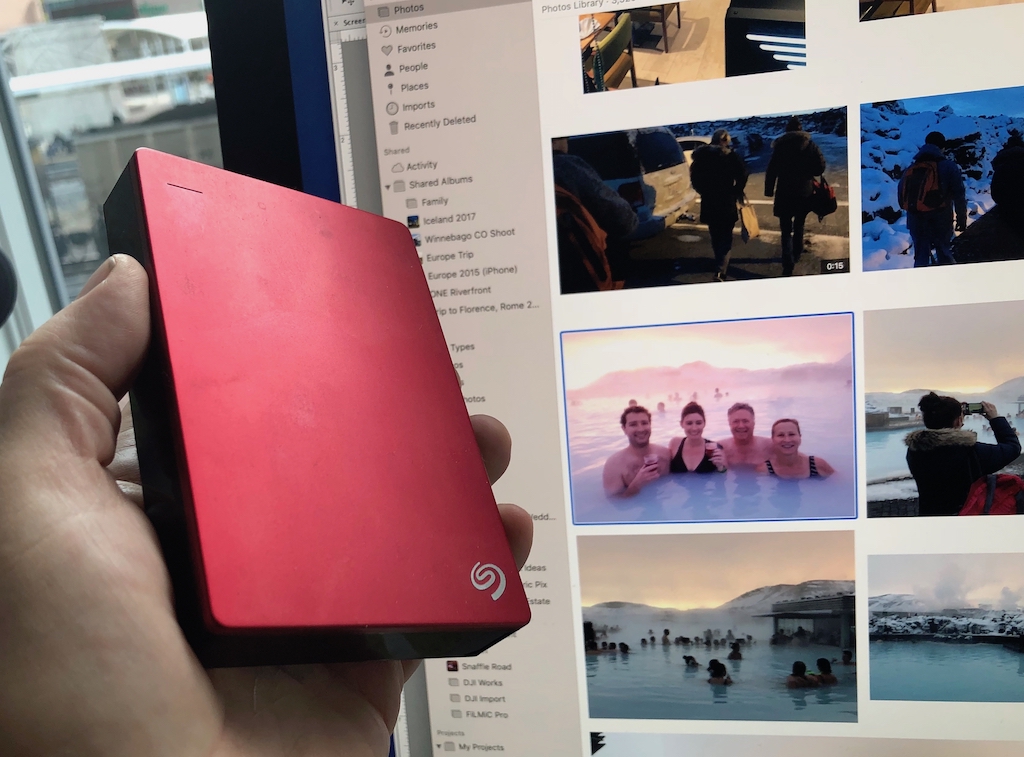 Today, USB hard drives are small, self-powered, and relatively inexpensive. You can easily move your library to other computers and also use a second drive for a mirrored backup. (The photo selected here - and featured at the top of this article - is from Christmas day 2017 at the Blue Lagoon in Iceland).
Hard Drives
It's most likely you'll manage your photos on your desk or laptop's hard drive. The quickest and easiest backup is to plug in a USB powered hard drive and copy your files to it. These drives are quite reliable and run $50-$100 depending on storage size. Your data is recorded on a tiny spinning platter and read by a "head" that floats above the fast rotating platters. Hard drives should have 50,000 - 100,000 hours of life, so as a backup device they're barely ever going to be used. However, I've seen some disks fail right out of the box. Generally, if it works right out of the box, it'll keep on working. If you have a hard drive failure, it's usually in the recording head armature. If all your memories are stored on a failed hard drive, you have the option of spending a ton of dough to ship the drive off to a company that will remove the platters and place them in a new read/write mechanism. However, there are zero guarantees that if this happens to a drive twenty years from now that parts will be available. Frankly, these days, I think you're more likely to slip and die in the bathtub than having a hard drive failure.
SSD Drives
The next generation of hard drives is solid state with no moving parts to fail. They are essentially giant memory chips called SSD drives and are currently more expensive than regular hard drives. But, ultimately, they will become the universal standard. Do not confuse an SSD drive with a USB memory stick. SSD drives are built with a much higher standard of data integrity compared to USB sticks. It's common to see data lost on USB sticks. However, nobody really talks about how long the little electrons of your most treasured picture of Uncle Bernie will stay in place in their little nanoscopic filing cabinet. That's why I recommend copying your files to new media about every decade (which also will keep you current with operating systems and physical connections like cables and jacks).
Cloud Storage
Finally, there is storage on the cloud. This is awesome, but you should still cover yourself with a physical HDD or SSD backup (off-site, too). Cloud storage presumes you have access to a high bandwidth connection. If you're a full-time RVer and dependent on a data plan, I'd recommend finding a terrestrial high-speed Internet connection to do all your original uploading. Once you've saved your photo files to the cloud, you will consume a lot less data with occasional updates.
Cloud services are available for free if you have a small amount of data (2-6 GB). In my case, all my photos and videos add up to nearly a half terabyte (1TB) of data. Storing that amount requires a paid account. Major players in cloud storage are Apple, Dropbox, Google, and Microsoft. I like Dropbox and pay $100 a year for a 1TB account. And here's why it's cooler than cool ...
On my desktop Mac, I've placed my photos folder inside the main Dropbox folder. That means that any photo or video I copy into that folder will be available on my hard drive and, quietly in the background, copied to the cloud. Those files will also appear on my other two laptop hard drives, but with a twist. Because I don't want to fill up the laptop hard drives, I can tell Dropbox which folders I want to sync on which devices. That way the photos are copied, but the big videos are not. This is called selective syncing and it works with Dropbox, Microsoft, and Google cloud accounts, but not with iCloud.
What's really fantastic is that you can access your files from any computer using a browser and your password. Though not actually stored on my iPhone or iPad, I can use the Dropbox app to view all my files and, if I want, download selected ones. Of course, all these strategies also apply to special documents you may have scanned.
An easy way to start
Right now you might not have the time to go back and completely put your digital house in order. But you can actually ease into building a process by forming good archival habits immediately. Simply start with creating a photos folder and, moving forward, putting your pictures into sub-folders. Either use an existing cloud account or create a new one for your photo, video and document files. As time and motivation dictate, you can then start going back and adding your older pictures (see my companion article on digitizing old photos). Stay with it and in time you'll get it done.
Taking the time to get your digital life organized is one of those tasks that might feel too time consuming and frustrating to do. I'd liken it to packing for a trip (which I hate) because you're faced with lots of mini-decisions. But once you start laying clothes out on the bed, things get a bit easier. Getting your organizational framework in place is the toughest part. After that, it's simply a question of electronically sorting and filing.
Once you're done, I can give you a 100% guarantee that three things will happen: (1) you will have a very deep sense of accomplishment, (2) you'll feel much happier knowing that your precious memories are safe from accidents and catastrophes, and (3) by having your memories organized and highly accessible, you'll find yourself sharing them easily and enjoying them more.
Comments
Comments on this post are moderated, so they will not appear instantly. All relevant questions and helpful notes are welcome! If you have a service inquiry or question related to your RV, please reach out to the customer care team directly using the phone numbers or contact form on this page .